Git
Git Bref
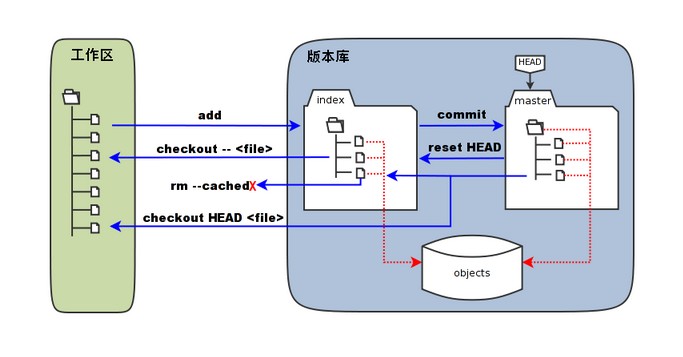
工作区:就是你在电脑里能看到的目录。
暂存区:英文叫 stage 或 index。一般存放在 .git 目录下的 index 文件(.git/index)中,所以我们把暂存区有时也叫作索引(index)。
版本库:工作区有一个隐藏目录 .git,这个不算工作区,而是 Git 的版本库。

- workspace:工作区
- staging area:暂存区/缓存区
- local repository:版本库或本地仓库
- remote repository:远程仓库
Git Workflows
https://www.atlassian.com/git/tutorials/comparing-workflows
Centralized 集中工作流
Feature Branch 功能分支
https://www.atlassian.com/git/tutorials/comparing-workflows/feature-branch-workflow
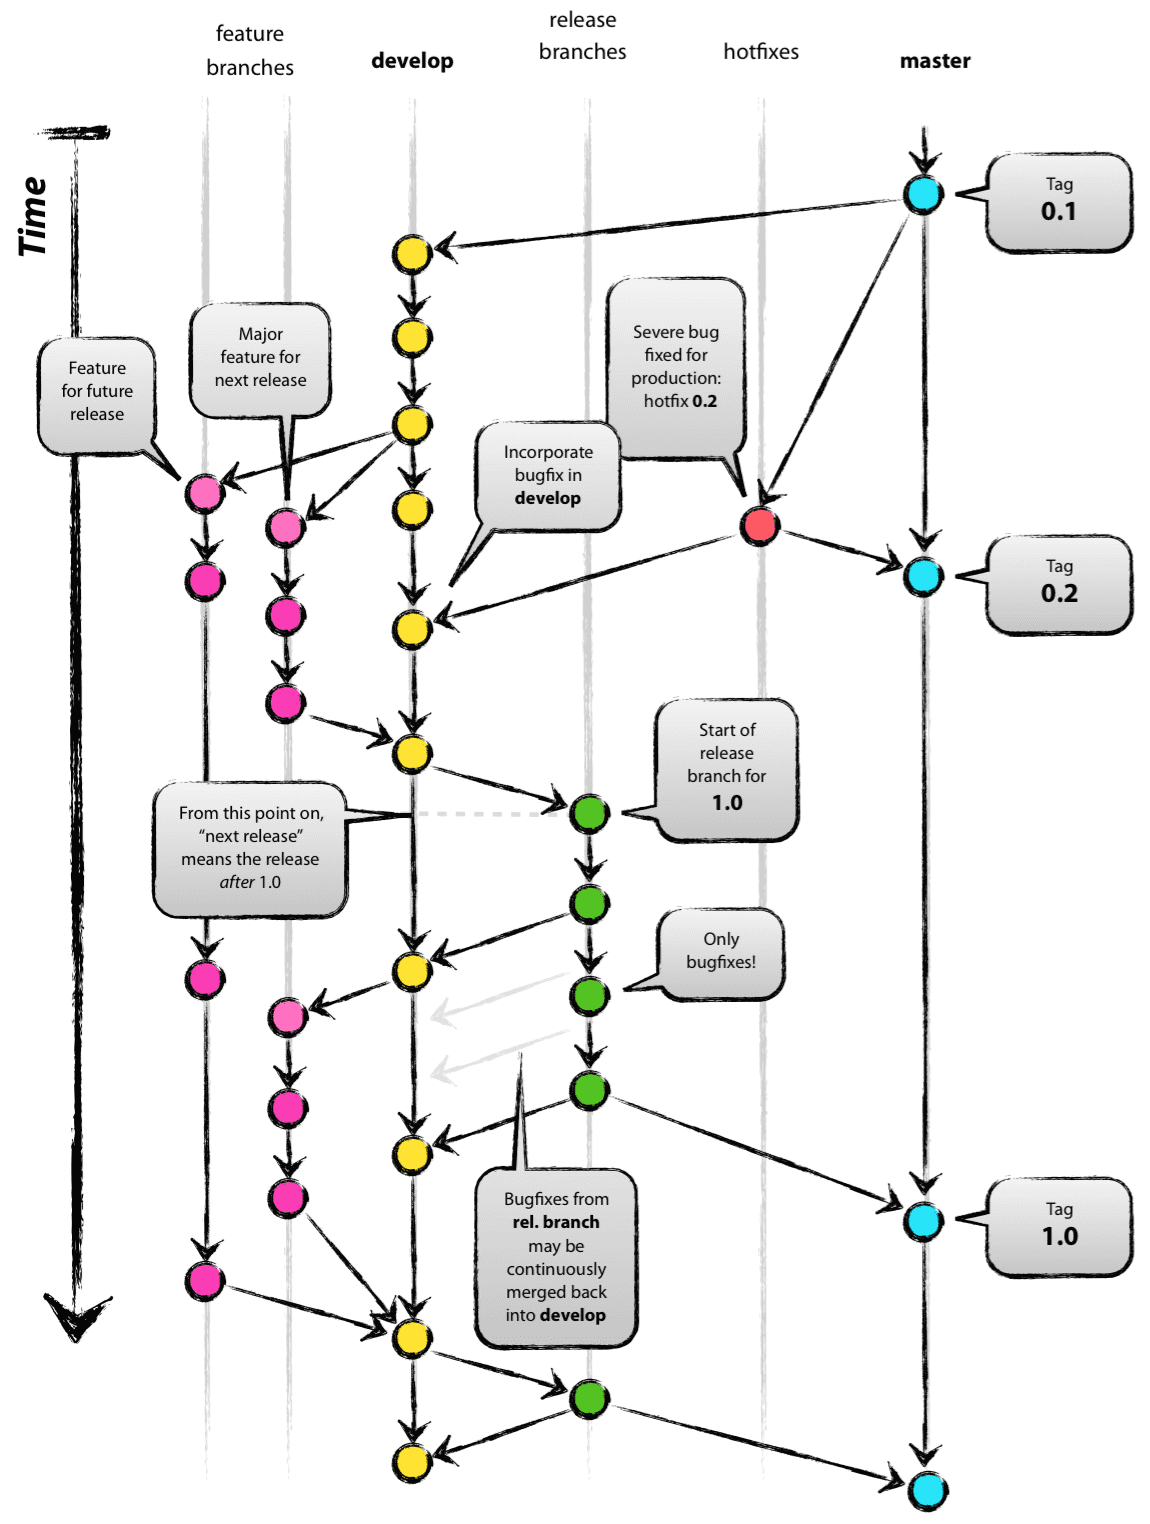
Gitflow
https://nvie.com/posts/a-successful-git-branching-model/
Forking 分叉
Forking Workflow通常遵循基于Gitflow Workflow的分支模型。这意味着完整的功能分支将用于合并到原始项目维护者的存储库中。结果是一个分布式工作流,它为大型有机团队(包括不受信任的第三方)安全地协作提供了一种灵活的方式。这也使其成为开源项目的理想工作流程。
Git commit 规范
格式
1 | |
subject、type是必须的,scope是可选的。
提交消息的任何一行都不能太多字符(72、100)!这是为了让消息更美观、容易阅读。
Allowed [type] 类型
This describes the kind of change that this commit is providing.
每个类型值都表示了不同的含义,类型值必须是以下的其中一个:
- feat (feature) 提交新功能
- fix (bug fix) 修复了bug
- docs (documentation) 只修改了文档
- style (formatting, missing semi colons, …) 调整代码格式
- refactor (Code refactoring, no new or deleted functions.) 代码重构
- perf (Performance optimization.) 性能优化
- test (when adding missing tests) 添加或修改代码测试
- chore (maintain) 对构建流程或辅助工具和依赖库(如文档生成等)的更改
- revet (revert change) 恢复更改
- wip (Work In Progress) 开发中
- release (release version) 版本发布
Revert
如果需要revert先前的提交,那提交消息应该以“revert:”开头,后跟要恢复到的那个提交的标题。然后在消息正文中,写上 This reverts commit <hash>.。
Allowed [scope] 影响范围
Scope can be anything specifying place of the commit change. For example $location, $browser, $compile, $rootScope, ngHref, ngClick, ngView, etc…
You can use * if there isn’t a more fitting scope. 您可以使用*如果没有更合适的范围。
[subject] text 标题
This is a very short description of the change.
- use imperative, present tense: “change” not “changed” nor “changes”
使用命令式、现在时:“change”而不是“changed”或“changes” - don’t capitalize first letter
不要将第一个字母大写 - no dot (.) at the end
末尾没有点 (.)
Message [body] 内容 正文
- just as in [subject] use imperative, present tense: “change” not “changed” nor “changes”
使用命令式、现在时:“change”而不是“changed”或“changes” - includes motivation for the change and contrasts with previous behavior
包括改变的动机以及与之前行为的对比
Message [footer] 页脚
Breaking changes 破坏性变更 不向下兼容
All breaking changes have to be mentioned as a breaking change block in the footer, which should start with the word BREAKING CHANGE: with a space or two newlines. The rest of the commit message is then the description of the change, justification and migration notes.
所有Breaking changes都必须在页脚中提及,这应该以BREAKING CHANGE一词开头:带有一个空格或两个换行符。提交消息的其余部分是更改的描述、理由和修改说明。
Referencing issues 参考文献
已关闭的错误应在页脚中的单独行中列出,并以“Closes”关键字为前缀,如下所示:
this:
Closes #234
or in case of multiple issues:
Closes #123, #245, #992
Examples
1 | |
1 | |
1 | |
基本命令list
创建仓库命令
下表列出了 git 创建仓库的命令:
| 命令 | 说明 |
|---|---|
git init | 初始化仓库 |
git clone | 拷贝一份远程仓库,也就是下载一个项目。 |
提交与修改
Git 的工作就是创建和保存你的项目的快照及与之后的快照进行对比。
下表列出了有关创建与提交你的项目的快照的命令:
| 命令 | 说明 |
|---|---|
git add | 添加文件到仓库 |
git status | 查看仓库当前的状态,显示有变更的文件。 |
git diff | 比较文件的不同,即暂存区和工作区的差异。 |
git commit | 提交暂存区到本地仓库。 |
git reset | 回退版本。 |
git rm | 删除工作区文件。 |
git mv | 移动或重命名工作区文件。 |
提交日志
| 命令 | 说明 |
|---|---|
git log | 查看历史提交记录 |
git blame <file> | 以列表形式查看指定文件的历史修改记录 |
远程操作
| 命令 | 说明 |
|---|---|
git remote | 远程仓库操作 |
git fetch | 从远程获取代码库 |
git pull | 下载远程代码并合并 |
git push | 上传远程代码并合并 |
基本命令
通用
| -d | –delete:删除 |
| -D | –delete –force的快捷键 |
| -f | –force:强制 |
| -m | –move:移动或重命名 |
| -M | –move –force的快捷键 |
| -r | –remote:远程 |
| -a | –all:所有 |
Git 配置
查看配置
列出当前配置:git config --list
列出repository配置:git config --local --list
列出全局配置:git config --global --list
列出系统配置:git config --system --list
配置
配置用户名:git config --global user.name "your name"
配置用户邮箱:git config --global user.email "youremail@github.com"
修改默认branch名: git config --global init.defaultBranch main
git走代理: git config --global http.proxy 'socks5://127.0.0.1:1080'
SSH key gen
1 | |
执行命令后需要进行3次或4次确认:
- 确认秘钥的保存路径(如果不需要改路径则直接回车);
- 如果上一步置顶的保存路径下已经有秘钥文件,则需要确认是否覆盖(如果之前的秘钥不再需要则直接回车覆盖,如需要则手动拷贝到其他目录后再覆盖);
- 创建密码(如果不需要密码则直接回车);
- 确认密码;
1 | |
Git命令
git init
初始化版本库
git clone
1 | |
1 | |
git log
git log --graph --pretty=oneline --abbrev-commit可以看到分支的合并情况,包括分支合并图(–graph)、一行显示(–pretty=oneline)、提交校验码缩略(–abbrev-commit)显示:
| 选项 | 说明 |
|---|---|
-<n> | 仅显示最近的 n 条提交。 |
--since, --after | 仅显示指定时间之后的提交。 |
--until, --before | 仅显示指定时间之前的提交。 |
--author | 仅显示作者匹配指定字符串的提交。 |
--committer | 仅显示提交者匹配指定字符串的提交。 |
--grep | 仅显示提交说明中包含指定字符串的提交。 |
-S | 仅显示添加或删除内容匹配指定字符串的提交。 |
git reflog
git blame
如果要查看指定文件的修改记录可以使用 git blame 命令,格式如下:
1 | |
git blame用来追溯一个指定文件的历史修改记录。它能显示任何文件中每行最后一次修改的提交记录。 所以,如果你在代码中看到一个有 bug 的方法,你可以使用 git blame 标注这个文件,查看哪一次提交引入了这行。
1 | |
git pull
git pull 命令用于从远程获取代码并合并本地的版本。
git pull 其实就是 git fetch 和 git merge FETCH_HEAD 的简写。 命令格式如下:
1 | |
更新操作:
1 | |
将远程主机 origin 的 master 分支拉取过来,与本地的 brantest 分支合并。
1 | |
git push
git push 命用于从将本地的分支版本上传到远程并合并。
命令格式如下:
1 | |
如果本地分支名与远程分支名相同,则可以省略冒号:
1 | |
如果本地版本与远程版本有差异,但又要强制推送可以使用 –force 参数:
1 | |
删除主机的分支可以使用 –delete 参数,以下命令表示删除 origin 主机的 master 分支,(慎用):
1 | |
git remote
| 参数 | |
|---|---|
-v | verbose显示详细一些的内容 |
1 | |
git add
| 参数 | |
|---|---|
| \–-all | 把所有文件添加到版本控制里面 |
| . | --all 同 |
git commit
git commit
| 参数 | |||
|---|---|---|---|
| -a | all | 受版本控制的所有文件 注意,新加的文件(即没有被git系统管理的文件)是不能被提交到本地仓库的 | |
| -m | message | 提交的注释 | git commit -m “this first commit” |
| - - amend | 修改上次提交的注释 |
1 | |
git status
| argv | ||
|---|---|---|
| -u | mode | |
| -uno | - 不显示未跟踪的文件。 | |
| -unormal | - 显示未跟踪的文件和目录。 | |
| -uall | - 还显示未跟踪目录中的单个文件。 |
查看那些被修改那些没被修改
git diff
查看与版本差异
git checkout
| 参数 | |||
|---|---|---|---|
| git checkout <branch> | 切换分支 | ||
| git checkou -b <branch> | build | 创建并切换分支 | |
| git checkout –orphan <branch> | 创建切换到孤立的分支 | ||
| git checkout – <file> | 从Staged恢复文件 重置全部文件用 -- . | ||
| git checkout HEAD – <file> | 从HEAD恢复文件 重置全部文件用 -- . |
git branch
| 参数 | |||
|---|---|---|---|
| git branch <branch> | 创建分支 | ||
| git branch -d <branch> | delete | 删除分支 | |
| git branch -D <branch> | 强制删除 | ||
| git branch (-m | -M) <oldbranch> <newbranch> | 重命名分支 | ||
| git branch | 查看当前分支 |
git tag
| 参数 | |||
|---|---|---|---|
| git tag | 查看标签 | ||
| git show | 查看指定标签的信息 | ||
| git tag <tag name> <commit id> | 创建 tag | ||
| -a | 指定标签名 | ||
| -m | 指定说明文字 | ||
| -l | 列出特定版本 git tag -l “v1.4.2.*” | ||
| -d | 删除 | ||
| git push origin <tag name> | 推送某个标签到远程 | ||
| git push origin –tags | 推送全部尚未推送到远程的本地标签 |
git rebase
变基
注: 需要切换到分支的后面, 再完成变基
git checkout <branch>
git rebae -d <master branch>
git merge
| 参数 | |
|---|---|
| git merge <branch> | 将分支合并到当前分支 |
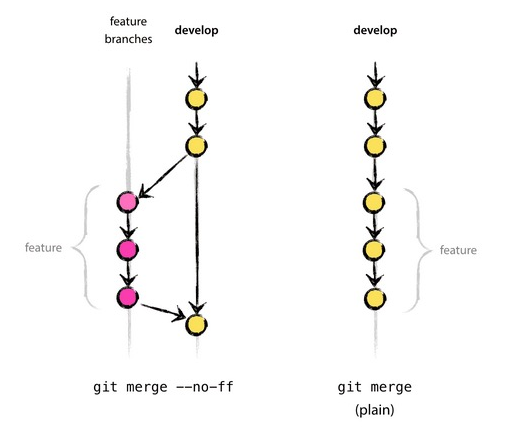
| git merge –no-ff <branch> | 禁用 快速合并模式(Fast forward) |
| git merge –ff-only <branch> | 快速合并(快进) |
git merge --abort | 中止这一次提交的合并(当遇到冲突时) |
| -m | massage |
git stash
| 参数 | |||
|---|---|---|---|
| git stash | 将当前未提交内容藏匿 | ||
| git stash list | 藏匿 list | ||
| git stash drop | 删除 藏匿 | ||
| git stash apply | 恢复 藏匿 | ||
| git stash pop | 恢复并删除 藏匿 |
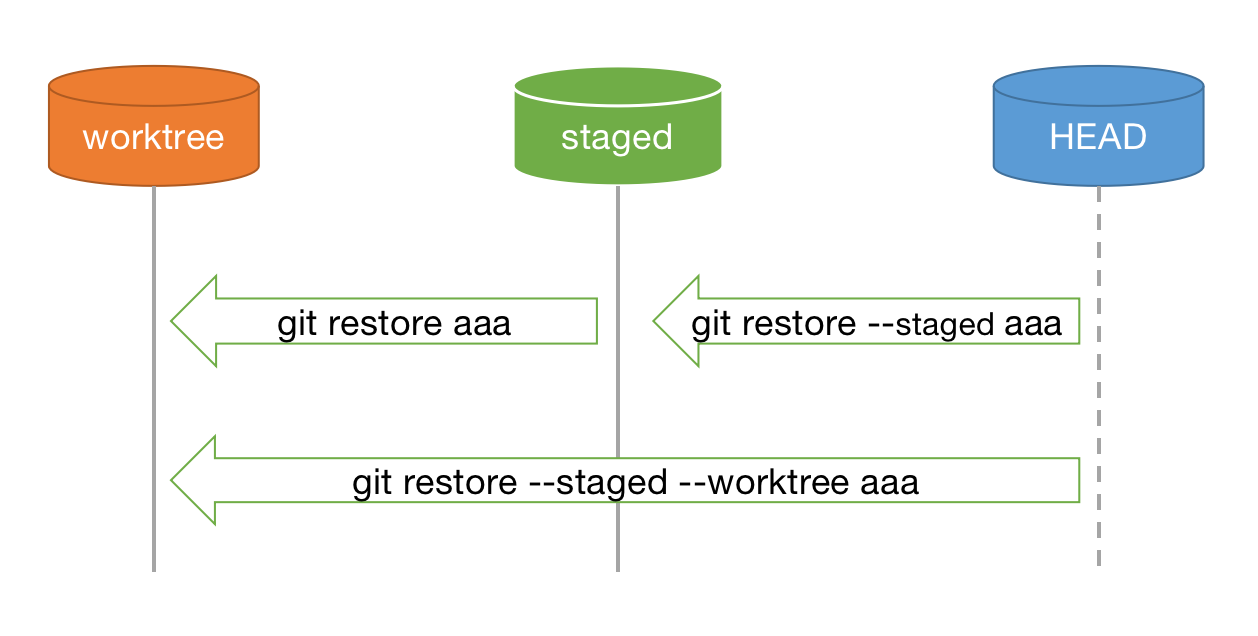
git restore 重置文件
类似 git checkout – <file> 重置文件
git restore <file>撤销工作区的修改,从暂存区恢复至工作区,如果工作区没有则从版本库恢复至工作区。
git restore –staged <file>用作清除暂存区的文件,不影响工作区以及版本库中的文件
git revert
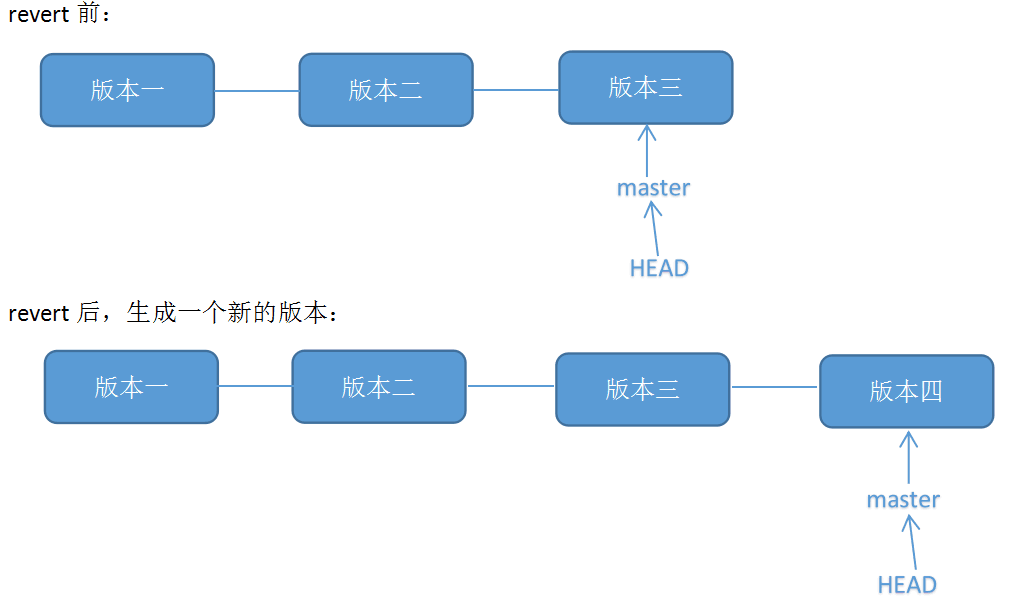
原理: git revert是用于“反做”某一个版本,以达到撤销该版本的修改的目的。比如,我们 commit 了三个版本(版本一、版本二、 版本三),突然发现版本二不行(如:有bug),想要撤销版本二,但又不想影响撤销版本三的提交,就可以用 git revert 命令来反做版本二,生成新的版本四,这个版本四里会保留版本三的东西,但撤销了版本二的东西。如下图所示:
git reset
原理: git reset的作用是修改HEAD的位置,即将HEAD指向的位置改变为之前存在的某个版本,如下图所示,假设我们要回退到版本一
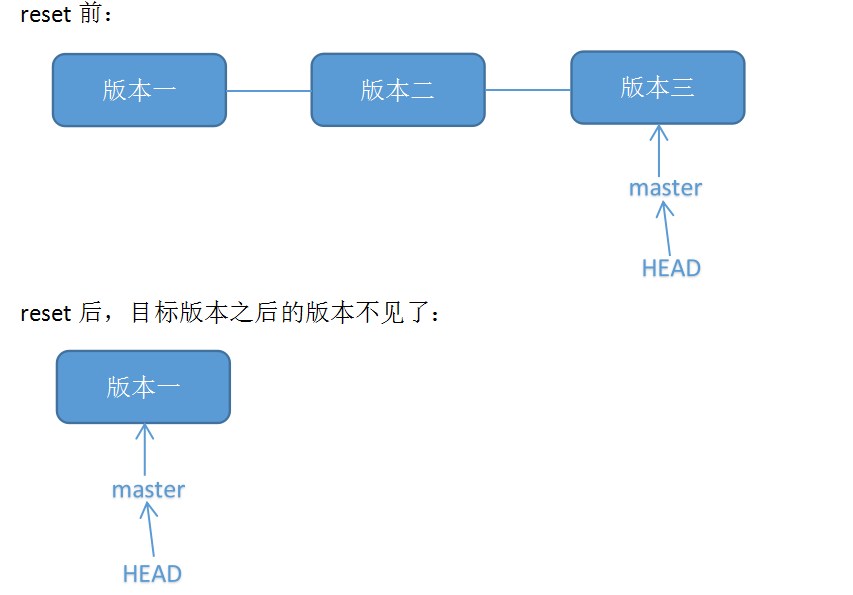
在Git中,用HEAD表示当前版本
版本回退 HEAD往前回退一个版本(同理这里可以写对应的版本号) git reset -–soft HEAD^
| 参数 | |||
|---|---|---|---|
| –- hard | 硬重置 | ||
| –- soft | |||
| –- mixed | |||
| –- merge | |||
| –- keep |
git switch
git switch 切换分支 远程有而本地没有的分支,而如果要从远程分支建一个同名的本地分支,并且关联远程分支
1 | |
git switch 创建一个新分支并切换到该新分支
1 | |
git switch 以一个提交commit来创建一个分支
1 | |
| 操作 | 2.23- | 2.23+ |
|---|---|---|
| 管理分支 | git branch | git branch |
| 切换分支 | git checkout | git switch |
| 新建+切换分支 | git checkout -b | git switch -c |
| 切换到commit id | git checkout | git checkout |
git rm
1 | |
1 | |
常用配置
.gitignore
可以参考Github的 https://github.com/github/gitignore
1 | |
Note
修改分支指针
git branch -f 分支名 commitID
作用是将其他分支上的本地代码硬重置到某个commitId下,不能重置本分支。比如我dev分支上某个节点的commitId叫 devID1
然后 git branch -f master devID1
那么master上的代码就会和dev一样,并且历史记录也会一样,只是dev分支上的代码可能会比master上的新一点,因为是重置的commitId
git status 显示不了汉字
git bash 终端输入命令:
1 | |
在git仓库文件夹内打开git bash,在git branch的界面中右击空白处,弹出菜单,选择option,编码设定为 gb2312。
git ssh 非标端口
1 | |
验证ssh链接
1 | |
删除远程分支
1 | |
删除全部历史提交记录
- 尝试 运行
git checkout --orphan latest_branch - 添加所有文件
git add -A - 提交更改
git commit -am "commit message" - 删除分支
git branch -D main - 将当前分支重命名
git branch -m main - 最后,强制更新存储库。
git push -f origin main
!清理仓库!
!谨慎操作! !谨慎操作! !谨慎操作! !谨慎操作! !谨慎操作!
- 可以先查看一下本地仓库的大小
1 | |
- 移除本地仓库中指向旧提交的剩余refs,
git for-each-ref会打印仓库中匹配refs/original的所有refs,并使用delete作为前缀,此命令通过管道传送到git update-ref命令,该命令会移除所有指向旧commit的引用。
1 | |
- 以下命令会使reflog到期,因为它依然包含着对旧commit的引用。使用
--expire=now参数,确保它在目前为止到期了。如果没有该参数,只会移除超过90天的reflog。
1 | |
- 现在本地仓库依然包含着所有旧commit的对象,但已经没有引用指向它们了,这些对象需要被删除掉。此时可以使用
git gc命令,Git的垃圾回收器会删除这些没有引用指向的对象。
1 | |
gc使用--prune 参数来清理特定时期的对象,默认情况下为2周,指定now将删除所有这些对象而没有时期限制。
du -sh .git此时,.git文件的大小只有104k了。
1 | |
- 如果确认所做的删除大文件操作没有问题,就可以提交到远程仓库了,一旦提交,再也没有办法恢复到原来的状态,一定要小心谨慎!一定要小心谨慎!一定要小心谨慎!
- 先进行备份工作,以免出现问题:
1 | |
- 再回到刚才做的已经瘦身的Git仓库
1 | |
- 把已瘦身的仓库同步到远程仓库,使用
—mirror参数:
1 | |
- 为了确保都已同步,再执行以下命令:
1 | |
一台电脑两个Github账号
生成两个ssh key
编辑config文件
1
2
3
4
5
6
7
8
9
10
11# Default GitHub
Host github.com
HostName github.com
User git
IdentityFile ~/.ssh/id_rsa
# Jack-InGitHub!
Host pq.github.com
HostName github.com
User git
IdentityFile ~/.ssh/id_rsa_a- github.com 用id_rsa密钥
- pq.github.com 用id_rsa_a密钥
原来
git@github.com:Jack-InGitHub/test.git现在
git@pq.github.com:Jack-InGitHub/test.git记得再配置不同的邮箱名
1 | |
利用管道删除全部本地分支
1 | |
克隆远程仓库
1 | |
删除未追踪的文件
1 | |
submodule 子模块 子仓库
1 | |
1 | |
- 还有更简单一点的方式。 如果给
git clone命令传递--recurse-submodules选项,它就会自动初始化并更新仓库中的每一个子模块, 包括可能存在的嵌套子模块。
删除 git submodule
1 | |
合并没有相关历史的提交
将test2分支合并到master分支中 git merge test2 --allow-unrelated-histories
合并两个没有相同历史的Git仓库
首先在需要合并的仓库中增加另外一个远程仓库 git remote add test2 http://git.xxx.xxx/test2
然后将test2的仓库拉取到本地 git fetch test2
创建本地分支 git checkout -b test2 test2/master
切换到目标分区 git checkout master
将test2分支合并到master分支中git merge test2 --allow-unrelated-histories
至此分支合并完成,只需将分支提交到服务器即可
将init后默认branch设定成为main
1 | |
1 | |
让git流量走代理 SSH的代理
1 | |
也可以直接修改~/.gitconfig文件。
1 | |
新建或修改这两项配置
1 | |
如果要取消代理:
1 | |
带参数是临时的,修改配置文件是永久变更,修改后最好重启git 设置生效。
查看配置信息:
1 | |
执行查看代理
1 | |
SSH流量
上面的方法只代理了http和https的流量, 我们用ssh协议的较多这就需要去代理ssh流量了
配置ssh走代理我们就需要去配置 ssh 程序(而不是git), 我们需要在 ~/.ssh/config 文件中设置 ProxyCommand 选项。
Linux 和 macOS 是通过
nc来执行ProxyCommand的,Windows 下则是通过
connect。
Linux SSH 配置
编辑 ~/.ssh/config 文件,给文件加上如下对应内容
1 | |
Windows SSH 配置
编辑 ~/.ssh/config 文件,然后增加如下内容:
1 | |
patch的使用
patch文件其实就是运行git diff控制台输出的信息并保存的文件.
patch的创建
1 | |
patch的应用
1 | |
patch出现一些提示, 这个提示的意思
1 | |
git branch 不单独输出在控制台 而是像新开页面一样
1 | |
一次推送多个远程仓库
使用 git remote set-url 命令
2.1# 删除方法一的 oschina 远程仓库。
1 | |
2.2# 使用如下命令添加远程仓库。
1 | |
2.3# 查看远程仓库情况。可以看到 github 远程仓库有两个 push 地址。这种方法的好处是每次只需要 push 一次就行了。
1 | |
修改配置文件
打开 .git/config 找到 [remote "github"],添加对应的 url 即可,效果如下。这种方法其实和方法二是一样的。
1 | |
忽略已经受到版本管理的文件修改
1 | |
.gitignore
.gitignore 文件是一个配置文件,用于告诉 Git 版本控制系统哪些文件或目录不需要被跟踪或包含在版本控制中。这个文件通常位于项目的根目录下,并且它的存在对于避免将不必要的文件(比如编译生成的文件、日志文件、个人配置文件等)加入到版本库中非常重要。
使用git config命令:
你可以通过设置Git的全局或仓库级别的配置来指定一个默认的.gitignore模板。例如,设置全局的.gitignore模板:
1 | |
**使用gitignore.io**:gitignore.io是一个在线服务,可以根据你使用的操作系统、编程语言和IDE生成.gitignore文件。访问gitignore.io,选择你需要的选项,然后下载生成的.gitignore文件。
1 | |
Tips: 如果你不慎在创建.gitignore文件之前就push了项目,那么即使你在.gitignore文件中写入新的过滤规则,这些规则也不会起作用,Git仍然会对所有文件进行版本管理。
语法:
1 | |
1 | |
已经受到版本库管理的文件需要忽略查考Note章节。
.gitattributes
.gitattributes 文件是一个配置文件,它允许你为 Git 仓库中的文件定义属性。这些属性可以影响 Git 的行为,例如如何合并文件、如何显示差异、文件的换行符处理等。.gitattributes 文件通常位于项目的根目录下,它与 .gitignore 文件不同,后者用于指定 Git 忽略的文件。
示例
下面是一个示例 .gitattributes 文件。 您可以将其用作仓库的模板:
1 | |
你会注意到,文件是匹配的,即 *.c、*.sln、*.png(用空格分隔),然后给定一个设置,即 text、text eol=crlf、binary。 我们将在下面介绍一些可能的设置。
text=autoGit 将以其认为的最佳方式处理文件。 这是一个合适的默认选项。- 在检出时
text eol=crlfGit 将始终把行结束符转换为CRLF。 你应将其用于必须保持CRLF结束符的文件,即使在 OSX 或 Linux 上。 - 在检出时
text eol=lfGit 将始终把行结束符转换为LF。 您应将其用于必须保持 LF 结束符的文件,即使在 Windows 上。 binaryGit 会理解指定文件不是文本,并且不应尝试更改这些文件。 该binary设置也是-text -diff的别名。
