WSL

安装

若要检查 Windows 版本及内部版本号,选择 Windows 徽标键 + R,然后键入“winver”,选择“确定”。更新到“设置”菜单中的最新 Windows 版本

IF (Windows 10 版本 2004 及更高版本(内部版本 19041 及更高版本)或 Windows 11)

一键自动安装 WSL

ELSE

旧版 WSL 的手动安装步骤(可以更改WSL系统的存放位置)

手动安装

手动安装的优点是避免Linux的镜像文件(ext4.vhdx)存放在C盘, 存放ext4.vhdx的位置可以自定义.

以下指令需要在管理员下的 powershell 运行

1
2
3
4
5
6
7
8
9
10
11
12
13
14
15
16
17
18
19
20
21
22
23
24
25
26
# 1 开启Microsoft-Windows-Subsystem-Linux
dism.exe /online /enable-feature /featurename:Microsoft-Windows-Subsystem-Linux /all /norestart

# 2 开启VirtualMachinePlatform
dism.exe /online /enable-feature /featurename:VirtualMachinePlatform /all /norestart

# 3 重启
# reboot

# 4 安装WLS2内核更新包
https://wslstorestorage.blob.core.windows.net/wslblob/wsl_update_x64.msi

# 5 将WSL2设为默认
wsl --set-default-version 2

# 6 下载离线包(可以避免将WSL的系统装在C盘)
https://docs.microsoft.com/zh-cn/windows/wsl/install-manual
# example
https://aka.ms/wslubuntu2004
https://aka.ms/wsl-ubuntu-1804
https://aka.ms/wsl-debian-gnulinux
# 离线包下载完成后解压缩 运行目录内的ubuntu.exe
# 会提示输入用户名和密码

# 7 (可选)安装 windows终端
https://docs.microsoft.com/en-us/windows/terminal/get-started 可选

卸载 & 禁用

  1. 在控制面板中禁用 Hyper-V

    1. 在“控制面板”中,打开“程序和功能”。
    2. 选择“启用或关闭 Windows 功能”。
    3. 展开 Hyper-V,展开 Hyper-V 平台,然后清除“Hyper-V 虚拟机监控程序”复选框。
  2. 在 PowerShell 中禁用 Hyper-V

    1. 打开提升权限的 PowerShell 窗口。

    2. 运行以下命令:

      1
      Disable-WindowsOptionalFeature -Online -FeatureName Microsoft-Hyper-V-Hypervisor

Note

U盘挂载

1
2
3
4
5
6
7
8
# 1 新建文件夹g
sudo mkdir /mnt/g
# 2 挂载盘符g
sudo mount -t drvfs g: /mnt/g
# 大功告成。进入/mnt/g即可操作

# 弹出移动硬盘,这样才能在windows下正常弹出,否则是会一直占用的。
sudo umount /mnt/g

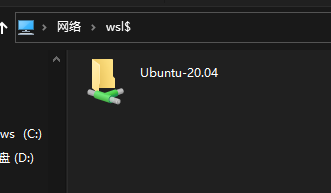
映射wsl文件系统

image-20211129131237501

1
\\wsl$

通过 \\wsl$ 访问 Linux 文件时将使用 WSL 分发版的默认用户。 因此,任何访问 Linux 文件的 Windows 应用都具有与默认用户相同的权限。

wsl关机

1
wsl --shutdown

wsl 配置文件

1
2
3
4
5
6
7
8
9
10
11
12
13
14
15
16
17
18
19
20
21
22
23
24
25
26
27
28
29
30
31
32
33
# Settings apply across all Linux distros running on WSL 2
[wsl2]

# Limits VM memory to use no more than 4 GB, this can be set as whole numbers using GB or MB
memory=4GB

# Sets the VM to use two virtual processors
processors=2

# Specify a custom Linux kernel to use with your installed distros. The default kernel used can be found at https://github.com/microsoft/WSL2-Linux-Kernel
kernel=C:\\temp\\myCustomKernel

# Sets additional kernel parameters, in this case enabling older Linux base images such as Centos 6
kernelCommandLine = vsyscall=emulate

# Sets amount of swap storage space to 8GB, default is 25% of available RAM
# 虚拟内存
swap=8GB

# Sets swapfile path location, default is %USERPROFILE%\AppData\Local\Temp\swap.vhdx
swapfile=C:\\temp\\wsl-swap.vhdx

# Disable page reporting so WSL retains all allocated memory claimed from Windows and releases none back when free
pageReporting=false

# Turn off default connection to bind WSL 2 localhost to Windows localhost
localhostforwarding=true

# Disables nested virtualization
nestedVirtualization=false

# Turns on output console showing contents of dmesg when opening a WSL 2 distro for debugging
debugConsole=true

打开powershell输入~切换目录

code .wslconfig编辑配置

1
2
3
4
[wsl2]
memory=2GB
swap=2GB
localhostForwarding=true

WSL 配置代理

获取主机 IP 主机 IP 保存在 /etc/resolv.conf 中

1
export hostip=$(cat /etc/resolv.conf |grep -oP '(?<=nameserver\ ).*')
1
2
3
4
5
6
7
8
export https_proxy="http://${hostip}:10881"
export http_proxy="http://${hostip}:10881"

export http_proxy="socks5://${hostip}:7890"
export https_proxy="socks5://${hostip}:7890"

export all_proxy="socks5://${hostip}:10880"
export all_proxy="http://${hostip}:10881"
  • 在wsl尝试用export all_proxysocks5做代理感觉总是调不通, 换成http就好了 不知道是为啥

wsl.conf .wslconfig配置文件

参考文档:

WSL 中的高级设置配置

wsl.conf

  • /etc unix 文件的形式存储在分发目录中。
  • 用于按分布配置设置。 此文件中配置的设置将仅应用于包含存储此文件的目录的特定 Linux 分发版。
  • 可用于版本、WSL 1 或 WSL 2 运行的分发版。
  • 若要访问已安装的发行版的 /etc 目录,请使用发行版的命令行和 cd / 访问根目录,然后使用 ls 列出文件或使用 explorer.exe . 在 Windows 文件资源管理器中查看。 目录路径应如下所示: /etc/wsl.conf

.wslconfig

  • 存储在目录中 %UserProfile%
  • 用于跨作为 WSL 2 版本运行的所有已安装 Linux 分发版全局配置设置。
  • 只能用于 WSL 2 运行的分发版。 作为 WSL 1 运行的分发版不会受到此配置的影响,因为它们未作为虚拟机运行。
  • 要访问 %UserProfile% 目录,请在 PowerShell 中使用 cd ~ 访问主目录(通常是用户配置文件 C:\Users\<UserName>),或者可以打开 Windows 文件资源管理器并在地址栏中输入 %UserProfile%。 目录路径应如下所示: C:\Users\<UserName>\.wslconfig

wsl.conf 的配置 (unix )

wsl.conf 文件支持四个部分:automountnetworkinteropuser[boot]

配置文件示例

1
2
3
4
5
6
7
8
9
10
11
12
13
14
15
16
17
18
19
20
21
22
23
24
25
26
27
28
29
30
31
32
33
# Automatically mount Windows drive when the distribution is launched
[automount]

# Set to true will automount fixed drives (C:/ or D:/) with DrvFs under the root directory set above. Set to false means drives won't be mounted automatically, but need to be mounted manually or with fstab.
enabled = true

# Sets the directory where fixed drives will be automatically mounted. This example changes the mount location, so your C-drive would be /c, rather than the default /mnt/c.
root = /

# DrvFs-specific options can be specified.
options = "metadata,uid=1003,gid=1003,umask=077,fmask=11,case=off"

# Sets the `/etc/fstab` file to be processed when a WSL distribution is launched.
mountFsTab = true

# Network host settings that enable the DNS server used by WSL 2. This example changes the hostname, sets generateHosts to false, preventing WSL from the default behavior of auto-generating /etc/hosts, and sets generateResolvConf to false, preventing WSL from auto-generating /etc/resolv.conf, so that you can create your own (ie. nameserver 1.1.1.1).
[network]
hostname = DemoHost
generateHosts = false
generateResolvConf = false

# Set whether WSL supports interop process like launching Windows apps and adding path variables. Setting these to false will block the launch of Windows processes and block adding $PATH environment variables.
[interop]
enabled = false
appendWindowsPath = false

# Set the user when launching a distribution with WSL.
[user]
default = DemoUser

# Set a command to run when a new WSL instance launches. This example starts the Docker container service.
[boot]
command = service docker start

自动装载设置 automount

节标签:[automount]

keydefault说明
enabledbooleantrue 导致固定驱动器(即 C:/D:/)自动装载到 DrvFs 中的 /mnt 下。 false 表示驱动器不会自动装载,但你仍可以手动或通过 fstab 装载驱动器。
mountFsTabbooleantrue 设置启动 WSL 时要处理的 /etc/fstab。 /etc/fstab 是可在其中声明其他文件系统的文件,类似于 SMB 共享。 因此,在启动时,可以在 WSL 中自动装载这些文件系统。
rootstring/mnt/设置固定驱动器要自动装载到的目录。 默认情况下,此设置设置为 /mnt/,因此 Windows 文件系统 C 驱动器已装载到 /mnt/c/。 如果更改为/mnt/``/windir/,应会看到已装载到/windir/c的固定 C 驱动器。
选项逗号分隔的值列表,例如 uid、gid 等,请参阅下面的自动装载选项空字符串下面列出了自动装载选项值,并追加到默认 DrvFs 装载选项字符串。 只能指定特定于 DrvFs 的选项。

网络设置 network

节标签:[network]

keydefault说明
generateHostsbooleantruetrue 将 WSL 设置为生成 /etc/hostshosts 文件包含主机名对应的 IP 地址的静态映射。
generateResolvConfbooleantruetrue 将 WSL 设置为生成 /etc/resolv.confresolv.conf 包含能够将给定主机名解析为其 IP 地址的 DNS 列表。
hostnamestringWindows 主机名设置要用于 WSL 分发的主机名。

互操作设置 interop

节标签:[interop]

这些选项在预览体验成员内部版本 17713 和更高版本中可用。

keydefault说明
enabledbooleantrue设置此键可确定 WSL 是否支持启动 Windows 进程。
appendWindowsPathbooleantrue设置此键可确定 WSL 是否会将 Windows 路径元素添加到 $PATH 环境变量。

用户设置 user

节标签:[user]

这些选项在版本 18980 及更高版本中可用。

keydefault说明
default字符串首次运行时创建的初始用户名设置此键指定在首次启动 WSL 会话时以哪个用户身份运行。

启动设置 boot

启动设置仅适用于 Windows 11 和 Server 2022。

节标签:[boot]

keydefault说明
命令string“”你希望在 WSL 实例启动时运行的命令字符串。 此命令以根用户身份运行。 例如: service docker start

.wslconfig 的配置 (windows)

全局 .wslconfig 配置选项仅适用于在 Windows 内部版本 19041 及更高版本中作为 WSL 2 运行的分发版。 请记住,可能需要运行 wsl --shutdown 来关闭 WSL 2 VM,然后重启 WSL 实例以使这些更改生效。

配置文件示例

1
2
3
4
5
6
7
8
9
10
11
12
13
14
15
16
17
18
19
20
21
22
23
24
25
26
27
28
29
30
31
32
# Settings apply across all Linux distros running on WSL 2
[wsl2]

# Limits VM memory to use no more than 4 GB, this can be set as whole numbers using GB or MB
memory=4GB

# Sets the VM to use two virtual processors
processors=2

# Specify a custom Linux kernel to use with your installed distros. The default kernel used can be found at https://github.com/microsoft/WSL2-Linux-Kernel
kernel=C:\\temp\\myCustomKernel

# Sets additional kernel parameters, in this case enabling older Linux base images such as Centos 6
kernelCommandLine = vsyscall=emulate

# Sets amount of swap storage space to 8GB, default is 25% of available RAM
swap=8GB

# Sets swapfile path location, default is %USERPROFILE%\AppData\Local\Temp\swap.vhdx
swapfile=C:\\temp\\wsl-swap.vhdx

# Disable page reporting so WSL retains all allocated memory claimed from Windows and releases none back when free
pageReporting=false

# Turn off default connection to bind WSL 2 localhost to Windows localhost
localhostforwarding=true

# Disables nested virtualization
nestedVirtualization=false

# Turns on output console showing contents of dmesg when opening a WSL 2 distro for debugging
debugConsole=true

节标签:[wsl2]

keydefault说明
内核 (kernel)字符串Microsoft 内置内核提供的收件箱自定义 Linux 内核的绝对 Windows 路径。
内存大小Windows 上总内存的 50% 或 8GB,以较小者为准;在 20175 之前的版本上:Windows 上总内存的 80%要分配给 WSL 2 VM 的内存量。
处理器数字Windows 上相同数量的处理器要分配给 WSL 2 VM 的处理器数量。
localhostForwardingbooleantrue一个布尔值,用于指定绑定到 WSL 2 VM 中的通配符或 localhost 的端口是否应可通过 localhost:port 从主机连接。
kernelCommandLine字符串空白其他内核命令行参数。
swap大小Windows 上 25% 的内存大小四舍五入到最接近的 GB要向 WSL 2 VM 添加的交换空间量,0 表示无交换文件。 交换存储是基于磁盘的 RAM,当内存需求超过硬件设备的限制时使用。
swapFile字符串%USERPROFILE%\AppData\Local\Temp\swap.vhdx交换虚拟硬盘的绝对 Windows 路径。
pageReportingbooleantrue默认设置 true 使 Windows 能够回收分配给 WSL 2 虚拟机的未使用的内存。
guiApplicationsboolean*true一个布尔值,用于在 WSL 中打开或关闭对 GUI 应用程序 (WSLg) 的支持。 仅适用于Windows 11。
debugConsoleboolean*false一个布尔值,用于在 WSL 2 发行版实例启动时打开显示 dmesg 内容的输出控制台窗口。 仅适用于Windows 11。
nestedVirtualizationboolean*true用于打开或关闭嵌套虚拟化的布尔值,使其他嵌套 VM 能够在 WSL 2 中运行。 仅适用于Windows 11。
vmIdleTimeoutnumber*60000VM 在关闭之前处于空闲状态的毫秒数。 仅适用于Windows 11。

具有 path 值的条目必须是带有转义反斜杠的 Windows 路径,例如:C:\\Temp\\myCustomKernel

具有 size 值的条目必须是后跟单位的大小,例如 8GB512MB

值类型后具有 * 的条目仅在Windows 11可用。

WSL导出与迁移

我们可以选择手动安装wsl, 这样我们可以避免将wsl安装在c盘, 手动安装的时候, 将下载下来的<distro>.appx文件直接解压, 例如将Ubuntu_1604.2019.523.0_x64.appx解压, 解压出来的文件夹内就包含了ubuntu1604.exe, 运行他就可以启动wsl, 这样可以避免wsl的迁移.

查看WSL分发版本

Windows PowerShell中输入如下命令, 查看当前子系统的状态和版本信息.

1
wsl -l --all  -v

结果如下:

1
2
3
  NAME      STATE           VERSION
* Ubuntu Running 2
Debian Stopped 2

导出分发版为tar文件

1
2
3
4
5
6
7
# 递归创建文件夹
mkdir -p d:\system\wsl\ubuntu20.04\
# 进入文件夹
cd d:\system\wsl\ubuntu20.04\
# 导出tar包 到当前目录
# (如果显示的子系统的`NAME`是带有版本号的话需要注意的是这里第二个参数就要带上参数, 例如`Ubuntu-20.04`)
wsl --export Ubuntu .\ubuntu20.04.tar
1
2
3
4
5
6
7
--export <发行版> <FileName> [选项]
将发行版导出为 tar 文件。
对于标准输出,文件名可以为 -。

选项:
--vhd
指定该发行版应导出为 .vhdx 文件。

注销当前分发版

1
wsl --unregister Ubuntu

重新导入并安装WSL

1
wsl --import Ubuntu .\ .\ubuntu20.04.tar --version 2
1
2
3
4
5
6
7
8
9
10
11
--import <发行版> <InstallLocation> <FileName> [选项]
将指定的 tar 文件作为新发行版导入。
对于标准输入,文件名可以为 -。

选项:
--version <版本>
指定新发行版要使用的版本。

--vhd
指定提供的文件是 .vhdx 文件,而不是 tar 文件。
此操作会在指定的安装位置复制 .vhdx 文件。

设置默认登陆用户为安装时用户名

(如果显示的子系统的NAME是带有版本号的话需要注意的是这里第二个参数就要带上参数, 例如Ubuntu-20.04)

1
ubuntu config --default-user Username

删除tar文件(可选)

1
rm .\ubuntu20.04.tar

语言和缺字体

wsl是没有中文字体的,所以在安装使用Firefox等软件时,无法正常显示中文字体,所以我们可以通过使用Windows自带字体的方式,来实现快速安装中文字体(以Ubuntu为例)。

1
sudo ln -s /mnt/c/Windows/Fonts /usr/share/fonts/font

我们只需要将Windows下的字体目录链接到WSL目录下即可然后再刷新一下。

1
fc-cache -fv

这样就可以正常显示中文字体了。


WSL
https://www.oikiou.top/2021/784ee20b/
作者
Oikiou
发布于
2021年11月29日
许可协议